Documentation
Set up Privatrak, name what matters to you and read every report.
Connect an AI assistant
Connect Claude, Codex, Cursor or another AI assistant to Privatrak, and ask about your website in your own words: which features people use, where they drop off, which clicks go wrong. If you allow it, your assistant can also set up features, funnels and dashboards for you. You connect it by signing in with your Privatrak account, without copying any key.
Once it is connected, see what you can ask and how it sets up your project.
Every assistant connects in the same three steps:
- Add the address
https://api.privatrak.com/mcpto your assistant. - A browser window opens. Sign in to Privatrak there.
- Choose which projects the assistant may see and what it may do. Then choose Allow access.
Before you start
- You have a Privatrak account, and your email address is confirmed.
- You have at least one project.
Connect the Claude app
- In Claude, open Settings and then Connectors.
- Choose Add custom connector.
- Enter a name, such as Privatrak, and the address
https://api.privatrak.com/mcp. - Choose Connect. A browser window opens, where you sign in to Privatrak.
The steps are the same in the Claude desktop app, on claude.ai and in the Claude mobile app.
Choose what your assistant may do
After you sign in, Privatrak shows Allow Claude to access Privatrak? with your assistant’s name in place of Claude. You answer two questions:
- Which projects can it see? Choose All my projects to include the projects you create or join later. Or choose Only these and tick the projects.
- What can it do? With Read, your assistant reads your analytics and changes nothing. With Read and write, it can also set up and change features, funnels and dashboards, and mark click problems as resolved or ignored.
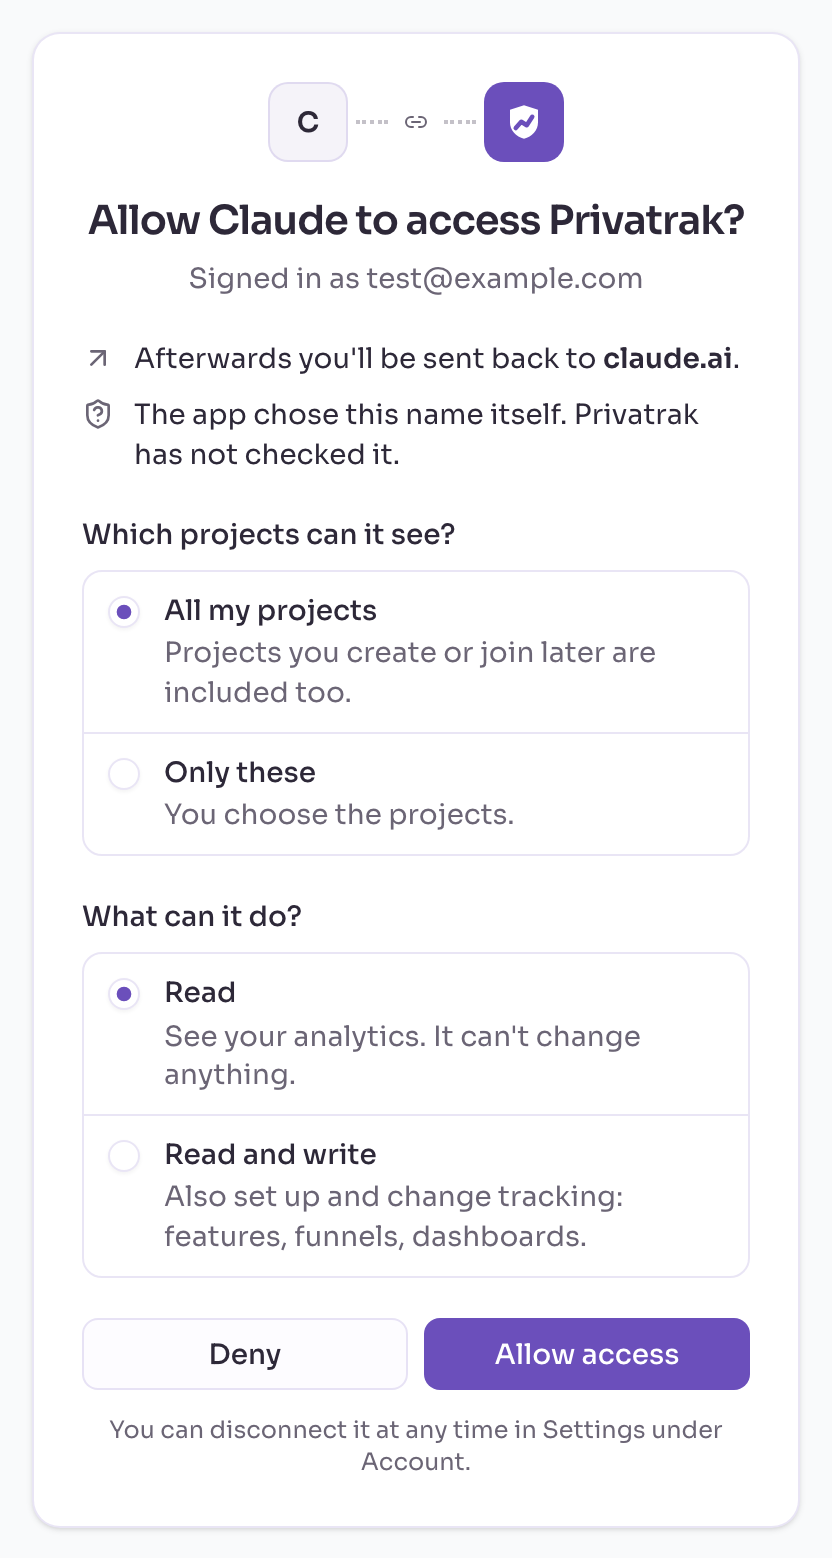
The option Read and write appears when your assistant asks to make changes. Everything it changes is recorded, and you can undo it in one step.
For some assistants the page adds The app chose this name itself. Privatrak has not checked it. Allow access then only if you started connecting from that assistant yourself.
Choose Allow access. Privatrak takes you back to your assistant, and the connection is ready. To change your answers later, disconnect the assistant and connect it again.
Connect Claude Code
Run this command in your terminal:
claude mcp add --transport http privatrak https://api.privatrak.com/mcpThen sign in:
- Start Claude Code and type
/mcp. - Pick privatrak and choose Authenticate.
- Your browser opens. Sign in to Privatrak there.
Claude Code keeps the connection for the folder you ran the command in. To use it in every folder, add --scope user to the command.
Connect Codex
Run these two commands in your terminal. The first adds Privatrak to Codex. The second opens your browser, where you sign in.
codex mcp add privatrak --url https://api.privatrak.com/mcp
codex mcp login privatrak
This is the same on a Mac, on Linux and on Windows.
The ChatGPT desktop app and the Codex editor extension read the same ~/.codex/config.toml as Codex in your terminal. So these steps cover all three. Restart the app after connecting.
Connect Cursor
Create the file .cursor/mcp.json in your project’s folder and paste this in. If the file already exists, add only the privatrak part inside mcpServers.
{
  "mcpServers": {
    "privatrak": {
      "url": "https://api.privatrak.com/mcp"
    }
  }
}
Cursor then asks you to sign in to Privatrak. Accept, and your browser opens. Sign in to Privatrak there.
The file holds no key, so it can go into your code repository. To use Privatrak in every project, put the same text in ~/.cursor/mcp.json in your home folder instead.
Other assistants
Any other assistant that supports MCP, the standard Claude and others use to connect to tools, connects the same way. Give it the address https://api.privatrak.com/mcp and sign in when the browser window opens. If your assistant cannot open a browser, connect it with an API key. Developers find every detail in the technical reference.
Check that it works
Ask your assistant: “Which Privatrak projects can you see?” It lists the projects you allowed. Then ask a first real question, such as “How many visitors did we have last week?”
Several projects
One connection covers every project you allowed. If it isn’t clear which project you mean, your assistant asks. You can also name the project in your question: “How many visitors did the shop have last week?”
Disconnect an assistant
- Go to Settings › Account and find Connected AI apps.
- At the end of the assistant’s row, choose the button with the plug icon. Confirm with Disconnect.
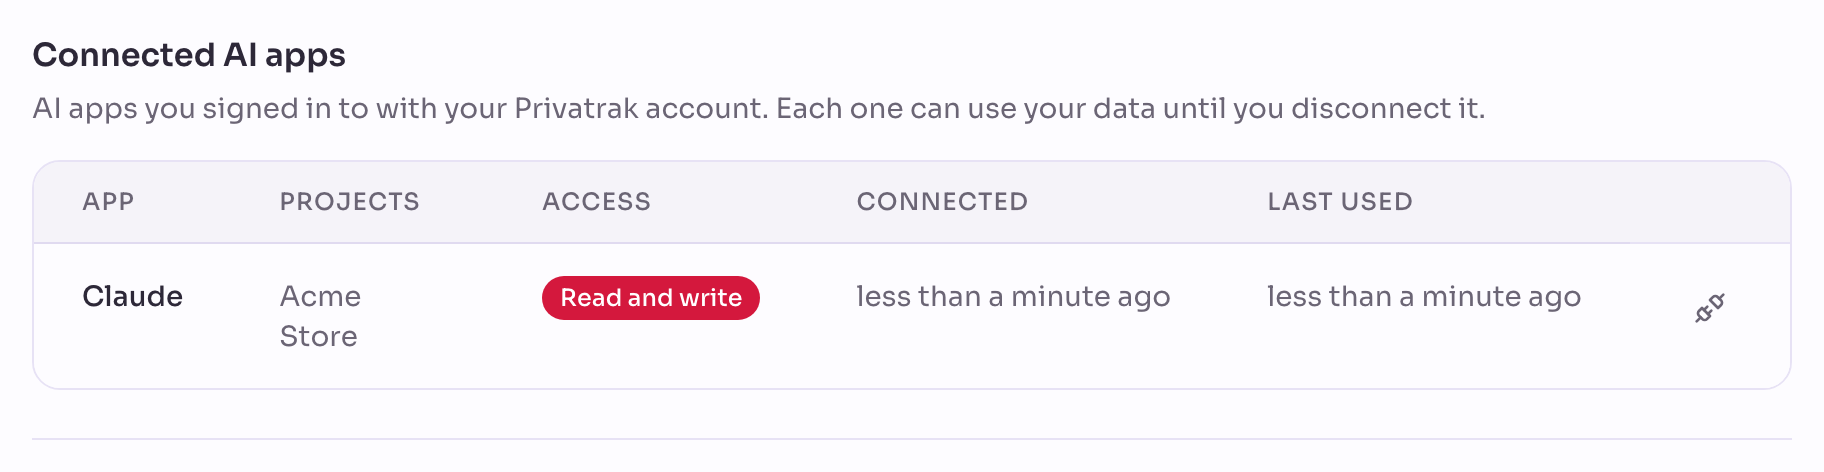
The assistant loses access right away. To use it again, connect it again from the assistant. Revoke All Sessions on the same page signs you out on every other device and disconnects every assistant at once.
An assistant connected with an API key loses access when you revoke its key on the API Keys page.
Connect with an API key
Some assistants cannot open a browser, for example one that runs in a script or on a server. Connect those with an API key. A key belongs to one project.
- Open the API Keys page in Settings and choose Create key.
- Choose Your AI assistant if the assistant should only answer questions. Choose Full access if it should also set up and change your project.
- Copy the key. Privatrak shows it only once, together with the command for your assistant with the key already filled in.
The commands for each assistant follow. Put your key in place of YOUR_KEY.
Claude Code
Run this in your terminal, in your project’s folder:
claude mcp add --transport http privatrak https://api.privatrak.com/mcp --header "Authorization: Bearer YOUR_KEY"Codex
Codex reads the key from a setting named PRIVATRAK_API_KEY every time it starts. So the key has to be saved where every new terminal window finds it.
On a Mac or Linux, add this line to your shell profile. That is the file ~/.zshrc in your home folder on a Mac, and usually ~/.bashrc on Linux:
export PRIVATRAK_API_KEY="YOUR_KEY"Then open a new terminal window and run:
codex mcp add privatrak --url https://api.privatrak.com/mcp --bearer-token-env-var PRIVATRAK_API_KEYOn Windows, run these three lines in PowerShell. The first saves the key for every PowerShell window you open afterwards. The second makes it work in the window that is already open. The third connects Codex.
setx PRIVATRAK_API_KEY "YOUR_KEY"
$env:PRIVATRAK_API_KEY = "YOUR_KEY"
codex mcp add privatrak --url https://api.privatrak.com/mcp --bearer-token-env-var PRIVATRAK_API_KEY
If Codex says it cannot connect to privatrak, the terminal it started in does not have the key. Open a new terminal window, or run the export line again. On Windows, run the $env: line again. If the desktop app or the editor extension cannot connect while your terminal can, open it from a terminal.
Cursor
Put this in .cursor/mcp.json in your project’s folder:
{
  "mcpServers": {
    "privatrak": {
      "url": "https://api.privatrak.com/mcp",
      "headers": { "Authorization": "Bearer YOUR_KEY" }
    }
  }
}
This file contains your key. Add .cursor/mcp.json to your .gitignore so the key never goes into your code repository.
Other assistants
Give the assistant the address https://api.privatrak.com/mcp and send the key in a header. Either Authorization: Bearer YOUR_KEY or X-API-Key: YOUR_KEY works.
To give each project its own key, or to switch from one key to another or to signing in, see Keys in your assistant’s settings in the technical reference.
Next steps
- Ask about your data: what to ask, and how to get good answers.
- Let it set up your project: let your assistant name features and build funnels and a dashboard.